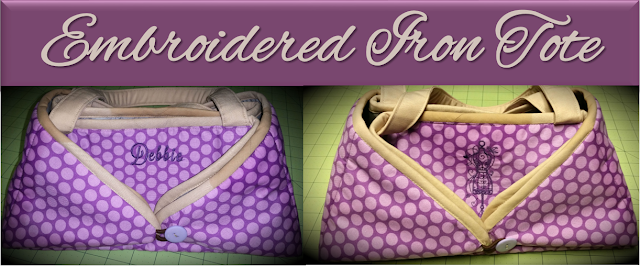
After sewing for awhile I found that my projects were piling up. This of course is because I always seem to put too many things on my to do list and don't have enough time to get them done. So I found myself traveling a lot with my projects to try and get them done in time. While I was able to make progress on things it was a little more difficult than working in my home space. I didn't have all the tools and proper working spaces that I was used to.
Strangely enough the sewing tool I seemed to be missing mostly places I went was an iron and an iron board. I started looking for different patterns or ideas for a traveling iron board and came across these cute iron tote pattern on The Painted Quilt. Not only was it cute but it was multi-functional as well. It served as both a place to iron as well as a way to protect my iron while traveling. I was so excited to get started working on this project. I looked though my stash and found the perfect sewing themed fabric to use on this.
I also happened to have some Insul-Bright and some iron board fabric.
The instructions state to create two versions of the pattern. I ultimately ended up creating the pattern on tracing paper once and realized that I could just as easily mark the fabric directly with the dimensions noted on the pattern instead of printing the pattern and cutting it. This was relatively easy to accomplish with the tools I had on hand as most of the lines were straight or 45 degree angles. The only one that presented a bit of an issues was the two side angles that didn't have a 90 degree line create the line. Instead I used the outside measurements to ensure my starting position was correct and then used my ruler to make a straight line to connect.
Once I had my pieces mark I moved on to embellishing the outside with some embroidery. I had found this embroidery file at Sealed With a Stitch awhile back and didn't know what I was going to use it for when I downloaded it but thought it was perfect for this project.
 |
| Originally posted at sealedwithastitch.com |
I used the smallest size in the download which fit perfectly in the space open for the tote. On the opposite side I was going to personalize the tote with a name. This is where I struggled a bit and maybe over time will get better at placing items to be somewhat centered.
I created the embroidery file for the name with the Singer Futura Software. I determined to fit properly between the folds of the tote the name could be no taller than 1 inch and no wider than 4 inches. If I wanted to I probably could have moved the name up an inch and would have had more space to work with but it turned out ok. Or at least it would have if I remembered to revert my embroidery file after doing two test runs of the embroidery. As you can see below I had the placement correct for the center of the tote just had the name down to far in the file itself.
Now that the embroidery was done and all the pieces were marked it was time to started sewing. I used my walking foot to keep the layers from bunching and going through evenly. I matched my bobbin thread to the color of the outside fabric and used a silver thread for the inside to match the iron fabric.
After trimming the corners the next step was to add the binding. I was looking forward to this step because I was going to be able to use my Simplicity Bias Tape maker. I was pretty impressed with how quick and easy it was to make binding. The part I always hate with making bias tape is the ironing. This handy dandy little machine does that for you.
It obviously not as perfect as store bought but pretty close and a lot cheaper. Now in regard to binding I always struggle. I for some reason just cant get it to look nice. I am always missing on one side or the other. I think if I were to do this again I would do the sandwich technique of adding bias tape and just sewing it once instead of trying to make the seam only visible on one side. I ended up making 3 of these. Two for myself since the first one wasn't lined up well and one for a friend.
All in all this turned out pretty great and has been such a time saver when traveling with projects. I actually find myself using this for my ironing as opposed to pulling out the big ironing board.


No comments:
Post a Comment