For a Christmas gift we received a jar of homemade honey. I wanted to ensure I shared our appreciation so I started searching for card inspiration on Pinterest. I found this absolutely perfect card at Cindy Lee Bee Designs. I had just recently downloaded a similar hexagon style design from the Silhouette Design store that would work perfect in the background. I wanted to do a little something extra with it then just cut it out of paper. I had recently started dabbling in trying to make my own embossing folders and thought this was a perfect candidate.
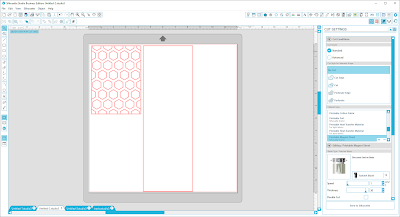
I set up the silhouette cut file to make an embossing folder 4 x 5.5 inches. I wanted to run this through my Texture Boutique and it will only handle embossing folders that are less than 5 inches wide. I started by adding the stamping kit honeycomb file.
This file was included in the Silhouette Stamping Starter Kit. I ungrouped the shaped and kept the hexagon outline. I did a select all and grouped it together again. I set the width to 5.5 inches and the height by 4 inches and rotated 90 degrees clockwise. I added a square cutting line the same size to ensure the full honeycomb would cut out. I also created another box 4 x 11.75 inches to act as the actual folder I would adhere the above pieces to. I decided to cut this out of quilter's plastic I found at Joann Fabrics. Per suggestions I found on other sites I used the printable magnet cutting settings on the cameo. This is what the final file looked like prior to sending through the Cameo.
At first I didn't think my cut settings were right as the cut didn't appear to go all the way through the plastic. I tried for a second time increasing my blade settings and still didn't appear to go all the way through. I decided to take the whole sheet of plastic off the mat and see if it could be salvaged. What I came to find was that the plastic did indeed cut all the way through but needed a little bit of help getting pulled apart. It reminded me of ripping the shapes out of fruit roll ups.
Now that all my pieces were pulled apart I had to figure out how I was going to adhere the cut pieces to the larger plastic piece I was using as my folder. I start by scoring lightly a fold line in the middle of the 4 x 11.75 piece. I tried using a glue adhesive and found the pieces slide around. I decided to give my Xyron sticker maker a shot. I sent all the pieces through and then started putting it together.
I started with the outline of the honeycomb. I found this to be the easiest since this pieces will still all together. Once this was stuck in place I took each of the hexagons and fit them into the honeycomb like a puzzel with the sticky side facing up. Once all the pieces were in place I closed the folder on itself to get the pieces perfectly aligned on the opposite side. I was super excited to test this out.
Now that I had my honeycomb embossing folder it was on to the paper bee I was going to add to the front of the card. I found the Happy Bumble Bee cut file through the silhouette design store. It took some trial and error but I figured out how to get this cut out so the colors would be the way I wanted them when fully assembled.
I searched for a coupled patterned piece to back the honeycomb panel and attached to my card base. This ultimately ended up being a very labor intensive card but turned out great and got me using my Silhouette Cameo in new ways I hadn't before.


No comments:
Post a Comment